A new boom in additive manufacturing
(This article was originally published in L'Édition N.19)
Several laboratories in Université Paris-Saclay are focusing their research on additive manufacturing and factories of the future. This includes process optimisation, part control and the development of new manufacturing processes.
Medical prostheses, cars, houses, satellites...the list of objects which can now be manufactured using 3D printing or additive manufacturing (AM) just continues to grow. Although the first patent application was in 1984, the technology only really took off in the mid-2000s with the gradual removal of patents on its processes and the marketing of the first 3D printers. To begin with, these were only used for fun before being applied to rapid prototyping.
Whether it is in the field of bioprinting, transportation, architecture, design or many others, manufacturers are quickly realising the many advantages of this technology. AM frees up designers’ creativity (by optimising the shapes and properties of manufactured parts) as much as it lowers production costs (by reducing wastage of materials or the number of parts to be manufactured). Since 2015, its world market has grown exponentially and industrial production is now counting on it to develop the industry of the future. As a result, several laboratories at Université Paris-Saclay are working on the optimisation of its processes and the quality of the parts manufactured.
A wide range of manufacturing processes
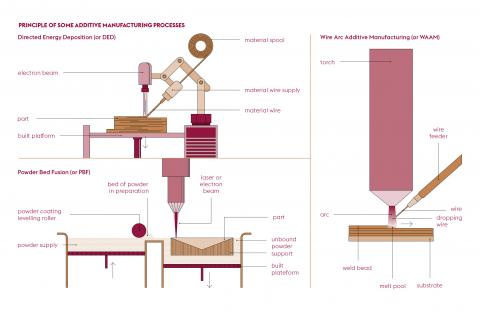
AM is the manufacture of parts in volume based on the addition of material, layer by layer, from a 3D digital model produced by computer-aided design (CAD) software. It includes seven types of process: vat photopolymerisation, material spraying, binder jetting, powder bed fusion, material extrusion, directed energy deposition and layer lamination. The choice of the process used depends on the type of material (thermosetting or thermoplastic polymers, wood, metals, ceramics), the final size of the part, the precision of the production or the desired output.
For the production of metal parts, which is particularly studied in the University laboratories, fusion processes are often preferred as they are more productive. Manufacturing is done using molten wire deposition, powder deposition or powder bed fusion.
From new materials...
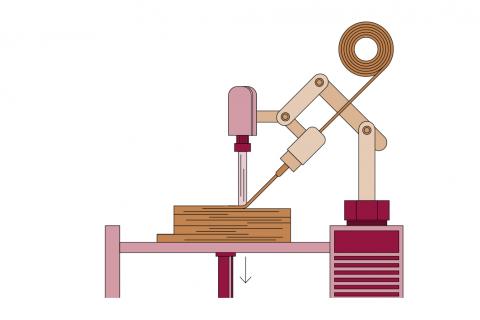
Scientists working within the Saclay’s Advanced Manufacturing and Technological Applications (SAMANTA) platform at CEA Paris-Saclay are particularly interested in the processes known as Direct Energy Deposit or DED using a laser or electron beam on powder or wire, as well as Laser Powder Bed Fusion or LPBF. They are focusing on developing new alloys or controlling the physical and chemical properties of a material with regard to its final application.
AM is also now increasingly becoming a technological building block for the discovery of new materials and the SAMANTA team is turning its attention to metal powders. They are seeking to develop high-entropy materials, also known as five-element alloys (iron, cobalt, aluminium, chromium, tungsten, titanium, molybdenum…). As part of the DIADEME Priority Research Programme and Equipment (PEPR), they are counting on artificial intelligence (AI) to help. “The first step is to produce a large number of samples using the DED process and then carry out a rapid screening of their properties. The large amount of data generated will then be dealt with using AI,” explains Hicham Maskrot, who manages the Surface Engineering and Laser Laboratory in the Physical Chemistry Department of CEA Paris-Saclay.
... to unusual behaviours
AM causes phenomena which did not exist before. It creates new microstructures in materials. For example, AM helps creating metamaterials (artificial materials with a periodic structure). As a result, the research carried out at SAMANTA has led to the development of metal filters, the manufacturing procedures for which were previously quite onerous. As a continuation of this work, the start-up AME2L, which is in the course of being set up, will be developing metamaterials for the filtration, shock absorbers and energy industries.
“Due to very rapid solidification processes, the constituent atoms in the material are arranged in very specific ways,” comments Hicham Maskrot. “It’s now just a question of determining whether these phenomena give the material a particular behaviour and how to influence its composition. For example, is the material manufactured more resistant to corrosion or irradiation than a conventional material?” In relation to these issues, SAMANTA addresses the needs of research teams and industry working on the energy mix.
Obsolescence, repair and monitoring of wear
In this area, AM is proving to be useful for adressing part obsolescence through reverse engineering. By taking an old part, whose original drawing is missing, and scanning it, it is possible to remake it using AM. “The use of LPBF allows a damaged part to be repaired locally on site,” points out Hicham Maskrot.
It is also possible to insert tracers (optical fibres, chemical or deformation sensors) into objects. They provide information on the state and behaviour of the material and the stresses undergone (temperature, irradiation, cracking, etc.) throughout the life of the object. “AM promotes the development of intelligent objects. For example, by placing phosphors or optical fibres in 316L steel (the most commonly used material in the nuclear industry), it’s possible to check in real time what state it is in. We know when to change the part and need only replace it when it’s worn out,” says Hicham Maskrot.
The necessary qualification of parts
However, like any new technology, AM is not without its obstacles. These include the efficiency of the machines, the size of the parts and, above all, their qualification. At the Control Methods Laboratory at CEA-List, Steve Mahaut’s team is working to improve the control of manufactured parts in order to better qualify the finished parts. “Today, manufacturers have monitoring data at their disposal. This is a manufacturing report certifying that the manufacturing process went well and that the customer’s instructions were respected. It remains to check that the manufactured part is compliant, or free of defects such as porosity, a lack of material or inadequate fusion,” says Steve Mahaut.
Is this data sufficient however to guarantee the correct conformity of the part? Even when all the machine parameters (temperature, speed, laser power, etc.) are controlled, processrelated phenomena can disrupt the manufacturing. For example, with Wire Arc Additive Manufacturing or WAAM, the distance between the part and the torch (the wire arc) changes during the manufacturing process as the part distorts with heat and time. If the distance becomes greater, this leads to the two welding plates being less well fused. In the case of laser fusion processes, ejected powder grains can shield and lead to poor fusion.
It is for these reasons that the team at CEA-List is developing sensors which are complementary to existing tools based on electromagnetic, non-contact ultrasound or radiographic methods. The challenge is to develop sensors which are as sensitive as possible to the most relevant information and to establish an intelligent correlation between all the physical data collected and the actual parts manufactured. “In this way, if we see in real time that for a given part, material or machine, the parameters guaranteeing the correct conformity of the part are not respected, we can either decide to stop production or correct – and this is AM’s ultimate goal – the part during production,” points out Steve Mahaut.
Qualification at the heart of projects
To this end, his team is involved in several French (within the Additive Factory Hub on the Saclay plateau) and European collaborative research projects, each involving a large consortium of academic and industrial players. The INTEGRADDE project, which revolves around the DED manufacturing of certified metal parts, aims to develop a smart data pipeline. This digital solution will integrate the part design data (CAD), the manufacturing data (laser trajectory and applied strategy), the data recorded during manufacturing, the control data and the finished part.
The GRADE2XL project is focusing on the WAAM process and its goal is the production of large bi-material parts. “The idea is to locally control specific material properties (hardness, corrosion resistance) in exposed or mechanically loaded areas. This would open up a whole new field of industrial processes,” says Steve Mahaut. Finally, the NUCOBAM project is looking at the control of parts during post fabrication and their qualification for use in the nuclear field.
A robot which speaks volumes
At the University research laboratory for automated production (LURPA – Univ. Paris- Saclay, ENS Paris-Saclay), researchers are also interested in the quality of parts made using AM. Their qualification involves using metrology instruments to measure, in one, two or three dimensions, deviations in the shape and dimensions of manufactured parts in order to plan for any post-processing operations which need to be carried out. In accordance with industry 4.0, their work aims to integrate this measurement step directly into the part production line. They are developing a solution based on an anthropomorphic robot (which reproduces the movements of a human arm) combined with a laser sensor.
“By putting laser sensors on an assembly line or on a robot and moving either the laser or the robot arm which holds the part, information can be obtained to qualify the part in mid-air. This avoids having to stop the line in order to carry out control measures. And if there’s any deviation, we’d know that the manufacturing process has to be changed,” explains Olivier Bruneau, who manages LURPA.
Identifying defects to perfect the manufacturing process
However, a robot has a great deal of joint and (to a lesser extent) segmental flexibility, loose, friction, parallax and vibration issues, small errors in geometric dimensions, etc., which ultimately leads to problems of accuracy and repeatable trajectories. Researchers at LURPA are trying to identify all these faults. Their goal is to develop new modelling methods which digitally incorporate these faults in order to obtain the best possible initial trajectory.
The laboratory has recently been equipped with a hybrid additive/subtractive manufacturing robot cell. An initial anthropomorphic robot manufactures a part using the WAAM process, while a second robot arm machines the part. “It doesn’t move from its support between steps, which reduces errors and saves time,” points out Olivier Bruneau. Cameras placed in the space ensures the correct implementation of the processes is monitored and controlled. The first experiments have started.
However, manufacturing a part in AM using a robot is a real challenge. “Three main parameters govern this manufacturing process. The speed at which the wire moves down and out of the feeder, the laser power used by the torch to melt the wire and the forward speed of the robot. The combination of the three influences the quality of the manufactured part,” explains Olivier Bruneau. “We must therefore determine the influence of each of the process parameters, then do the same with the robot faults and finally estimate the influence of combining one with the other. This creates a combinatorial explosion for which artificial intelligence will help us to identify the right areas of the part to manufacture.”
Additive manufacturing has definitely not yet finished reinventing itself.
Publications
- M. Nussbaum, et al. Mechanical properties and high temperature oxidation resistance of (AlCrTiV) N coatings synthesized by cathodic arc deposition. Surface and Coatings Technology, Vol. 434, 2022.
- Matthias Bordron et al. Inline measurement strategy for additive manufacturing. Proceedings of the Institution of Mechanical Engineers, Part B: Journal of Engineering Manufacture, Vol. 233 (5), 1402-1411, 2019.

